New Student Admission Creation
Introduction
The New Student Admissions feature in EnrollX provides a streamlined and intuitive process for enrolling new students into various programs offered by the institution. This feature is essential for admissions staff to manage the influx of new admissions efficiently.This guide provides a step-by-step process for managing New Student Admission within the EnrollX Platform, facilitating structured student admissions management.
Getting Started
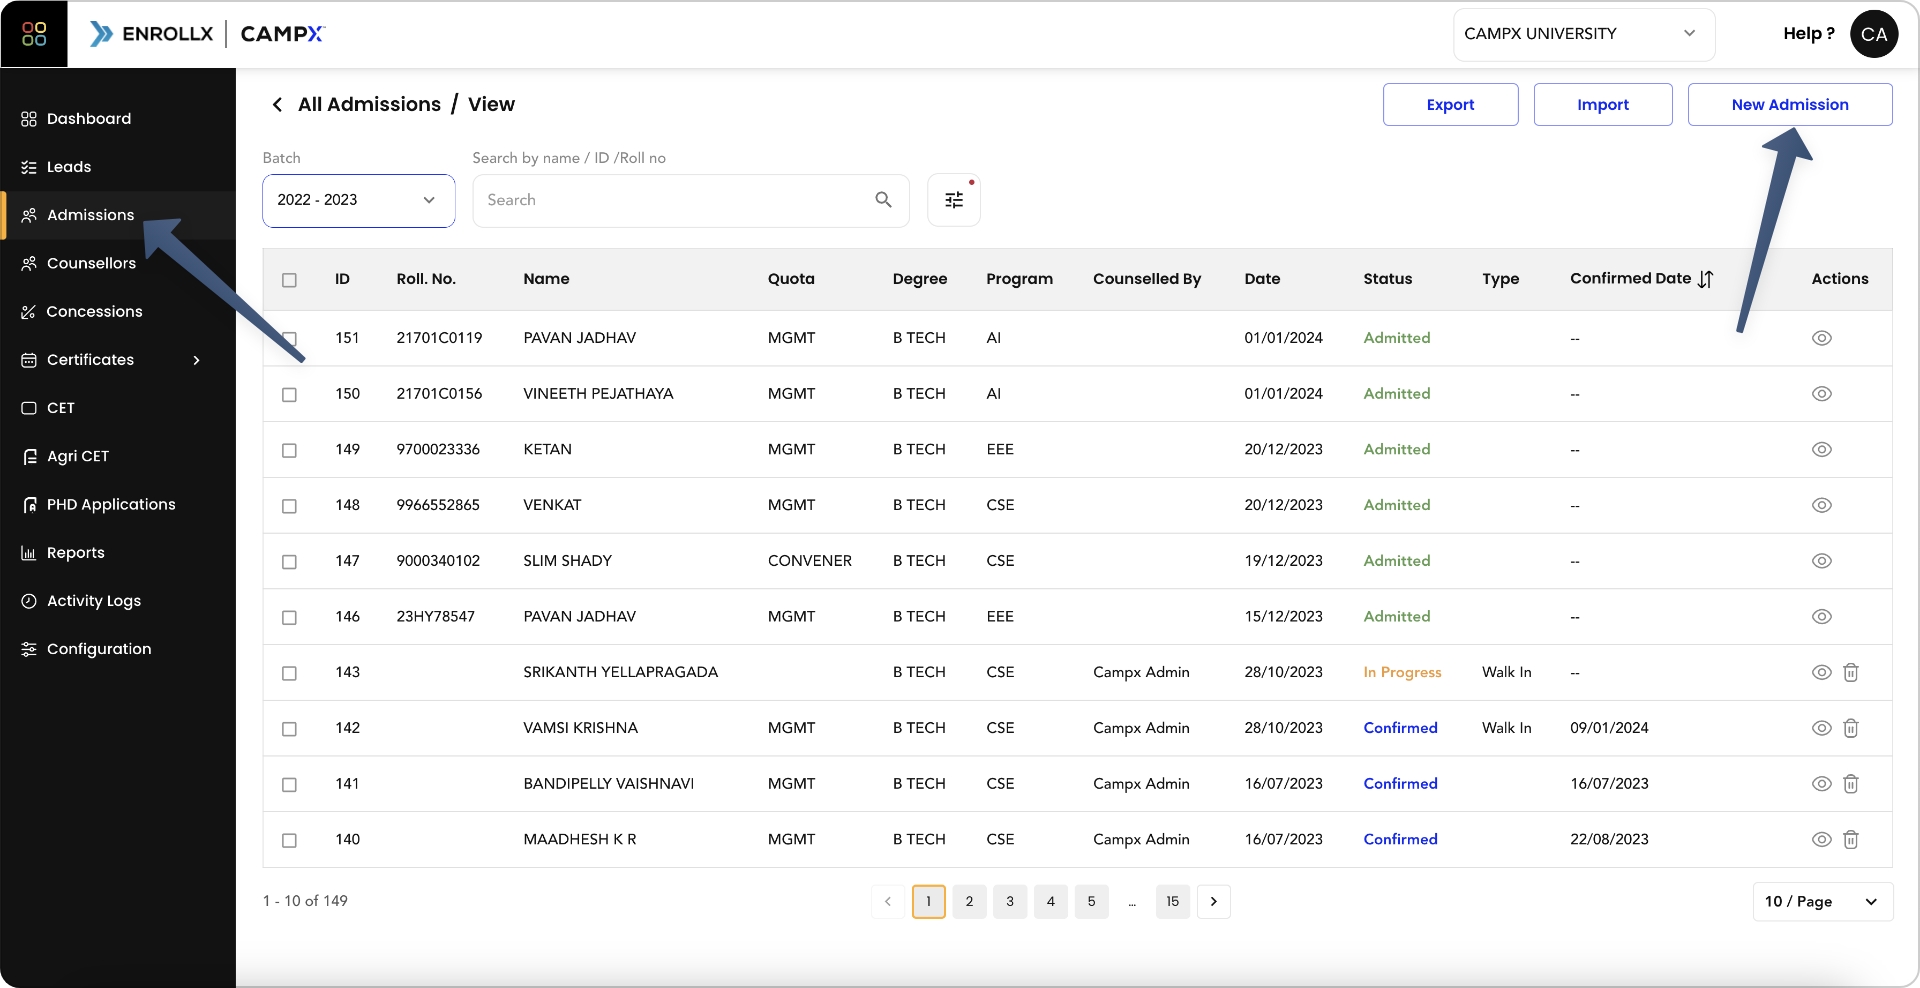
To begin managing New Admissions, here’s how to navigate:
- Sign in to your CampX account and access EnrollX app.
- Click on the
Admissionssection in the EnrollX sidebar. - Inside the 'Admissions` page you will find the list of Admission notification for that respective batches
- Click on respective Admission Notification to view
Admissions List - Inside the
Admissions Listpage you will find options forNew AdmissionandImport Admissions - Inside the
Admissions Listpage you will also find options forSearch Admissions,Filter Admissions, andExport Admissions.
Performing Actions
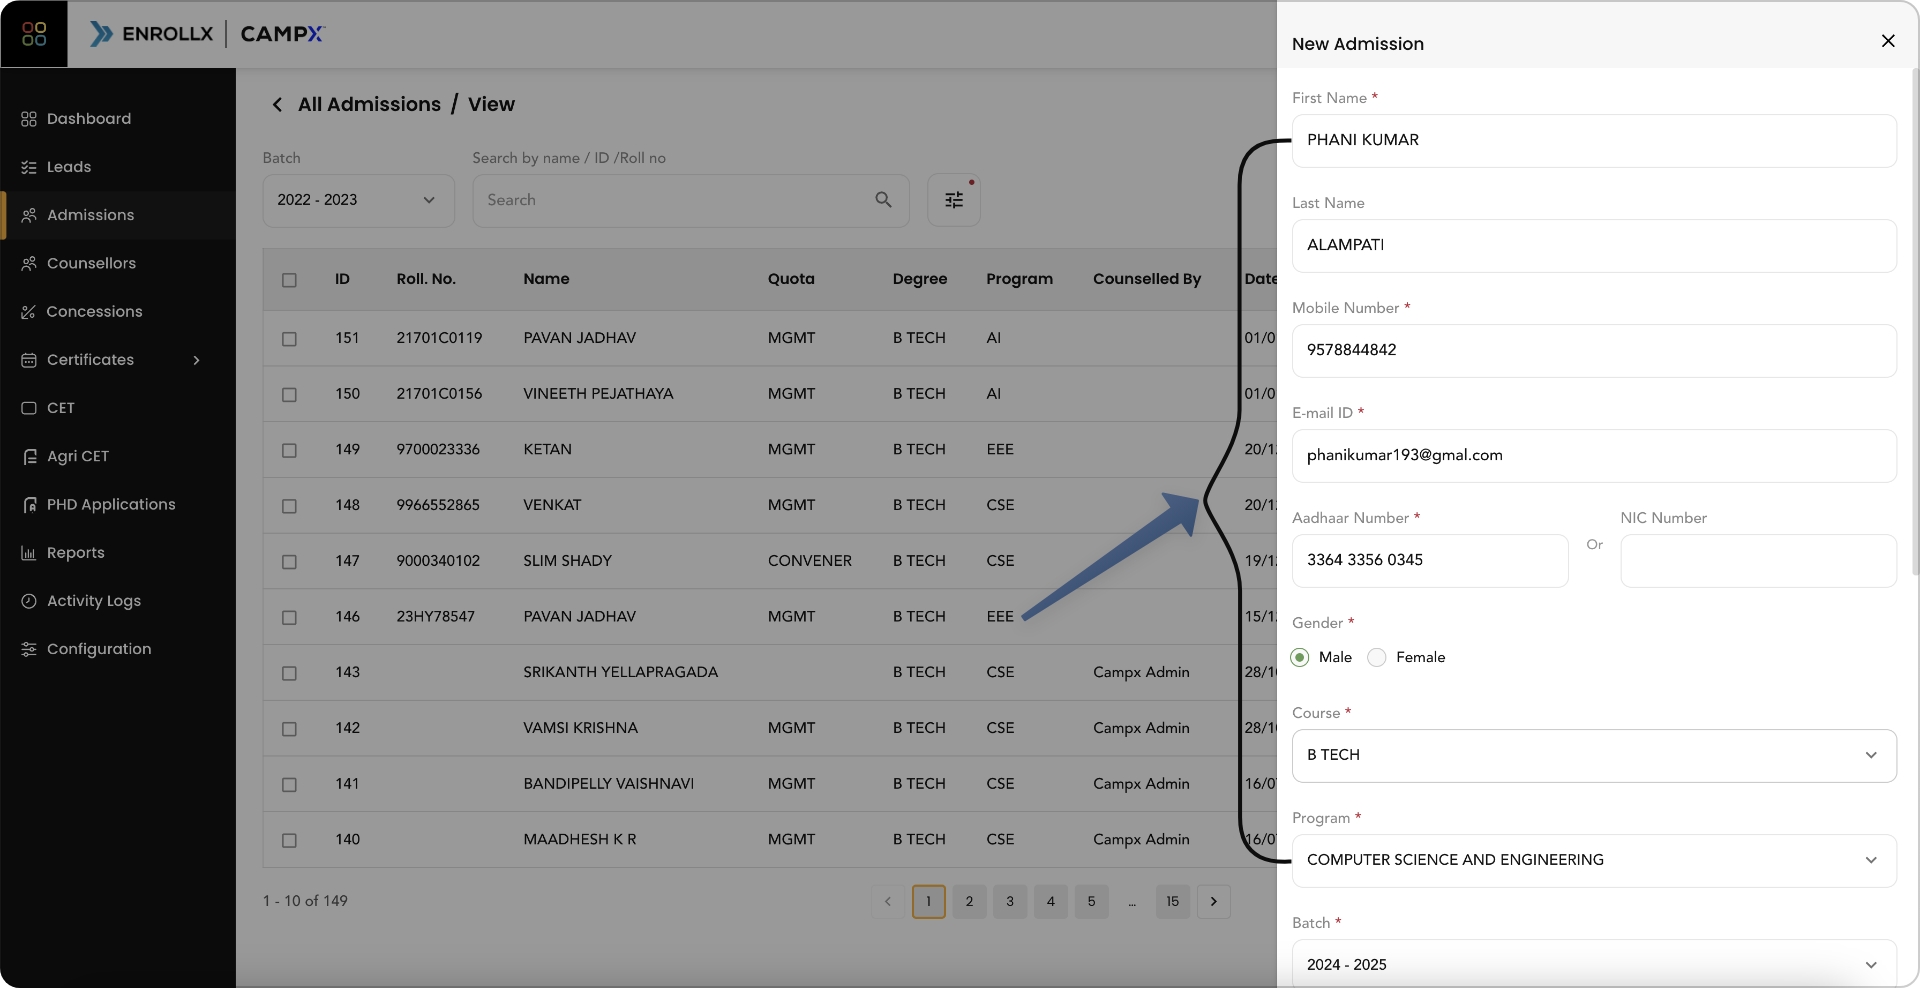
Creating a New Admission: Click on New Admission and provide the following details
- For Contact Information: Update the information for the respective fields First Name, Last Name, Mobile Number, Gender, Aadhar Number or NIC Number, 10+2 Hall Ticket Number, Guardians Name and Guardians Mobile Number.
- For Academic Preferences Update the information for the respective fields Batch, Course, Program, from the dropdown.
- Select the Admission Phase and enter any additional comments if necessary.
- Click
Create Admissionto submit the information orCancelto abort the process.
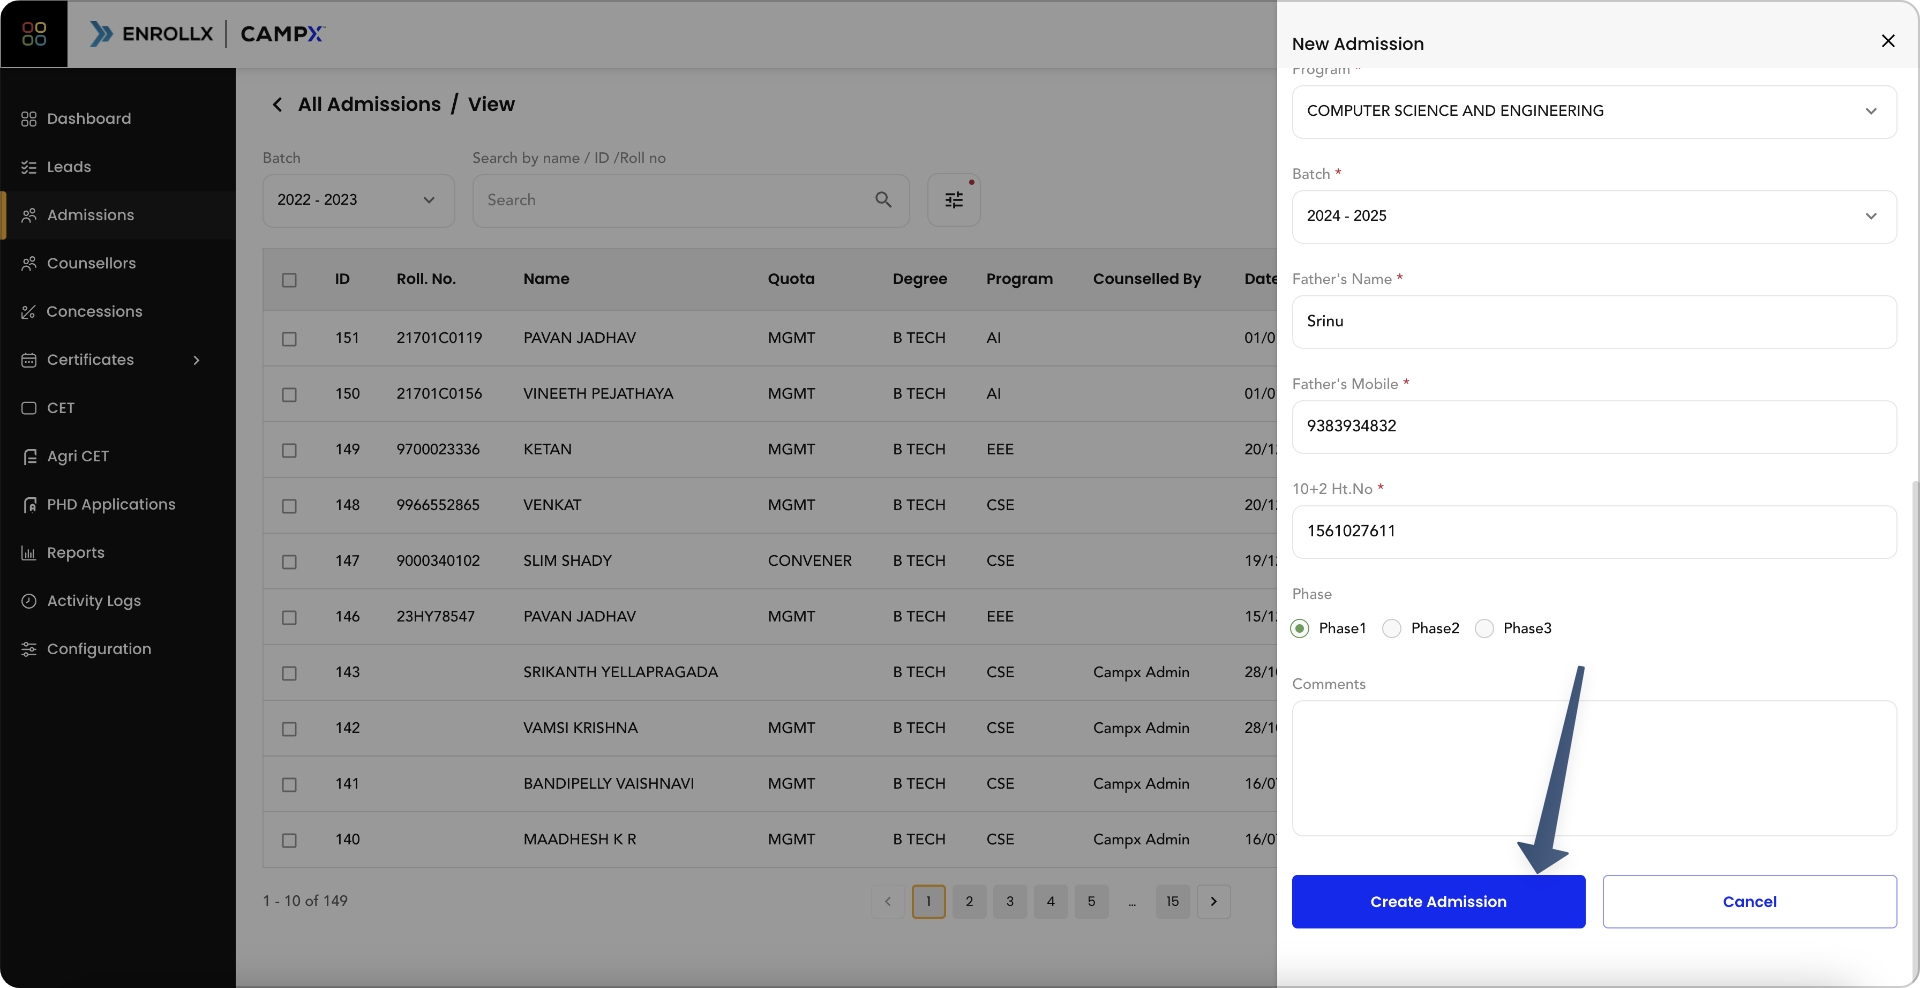
- The Assigned Counsellor needs to update all the required mandatory details in the New Admission Creation Form.
- If you are facing an error while updating please check the input validation for Mobile Number, Email Address.
Actions in the Admissions Table:
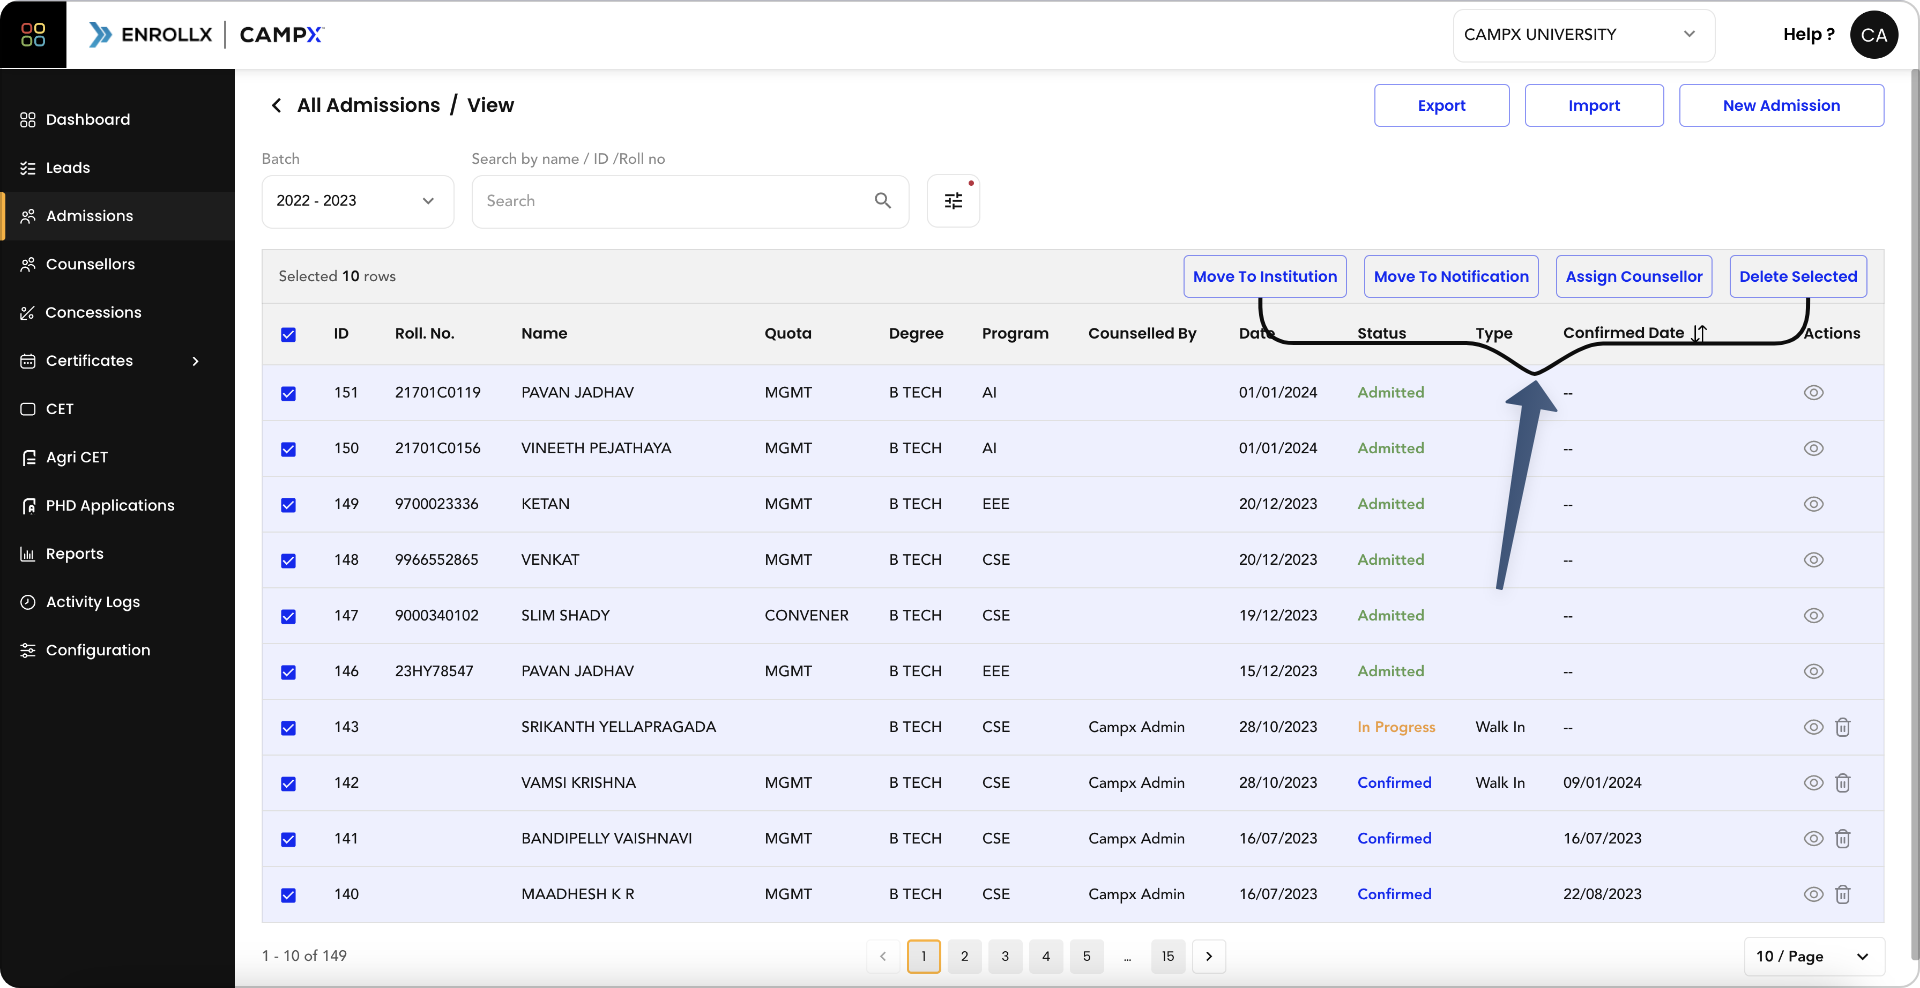
- The Admissions Team can select single or multiple admissions and assign to a respective Admissions Counsellor.
- The Assigned Counsellor can select a single or multiple admissions and move them to an institution by selecting Course, Program, Batch, Admission Notification.
- The Assigned Counsellor can select a single or multiple admissions and move them to an Admission Notification by selecting from the list of notifications created in the respective batch.
Search Functionality: Utilize the search bar to locate admissions by student name or admissions id quickly.
Filtering Admissions: Apply filters to sort admissions by Courses, Programs, Admission Counselor, Batch, Admission Type, Admission Phase, Lateral Entry Students, enabling you to manage admissions more efficiently.
Adding or Modifying Elements
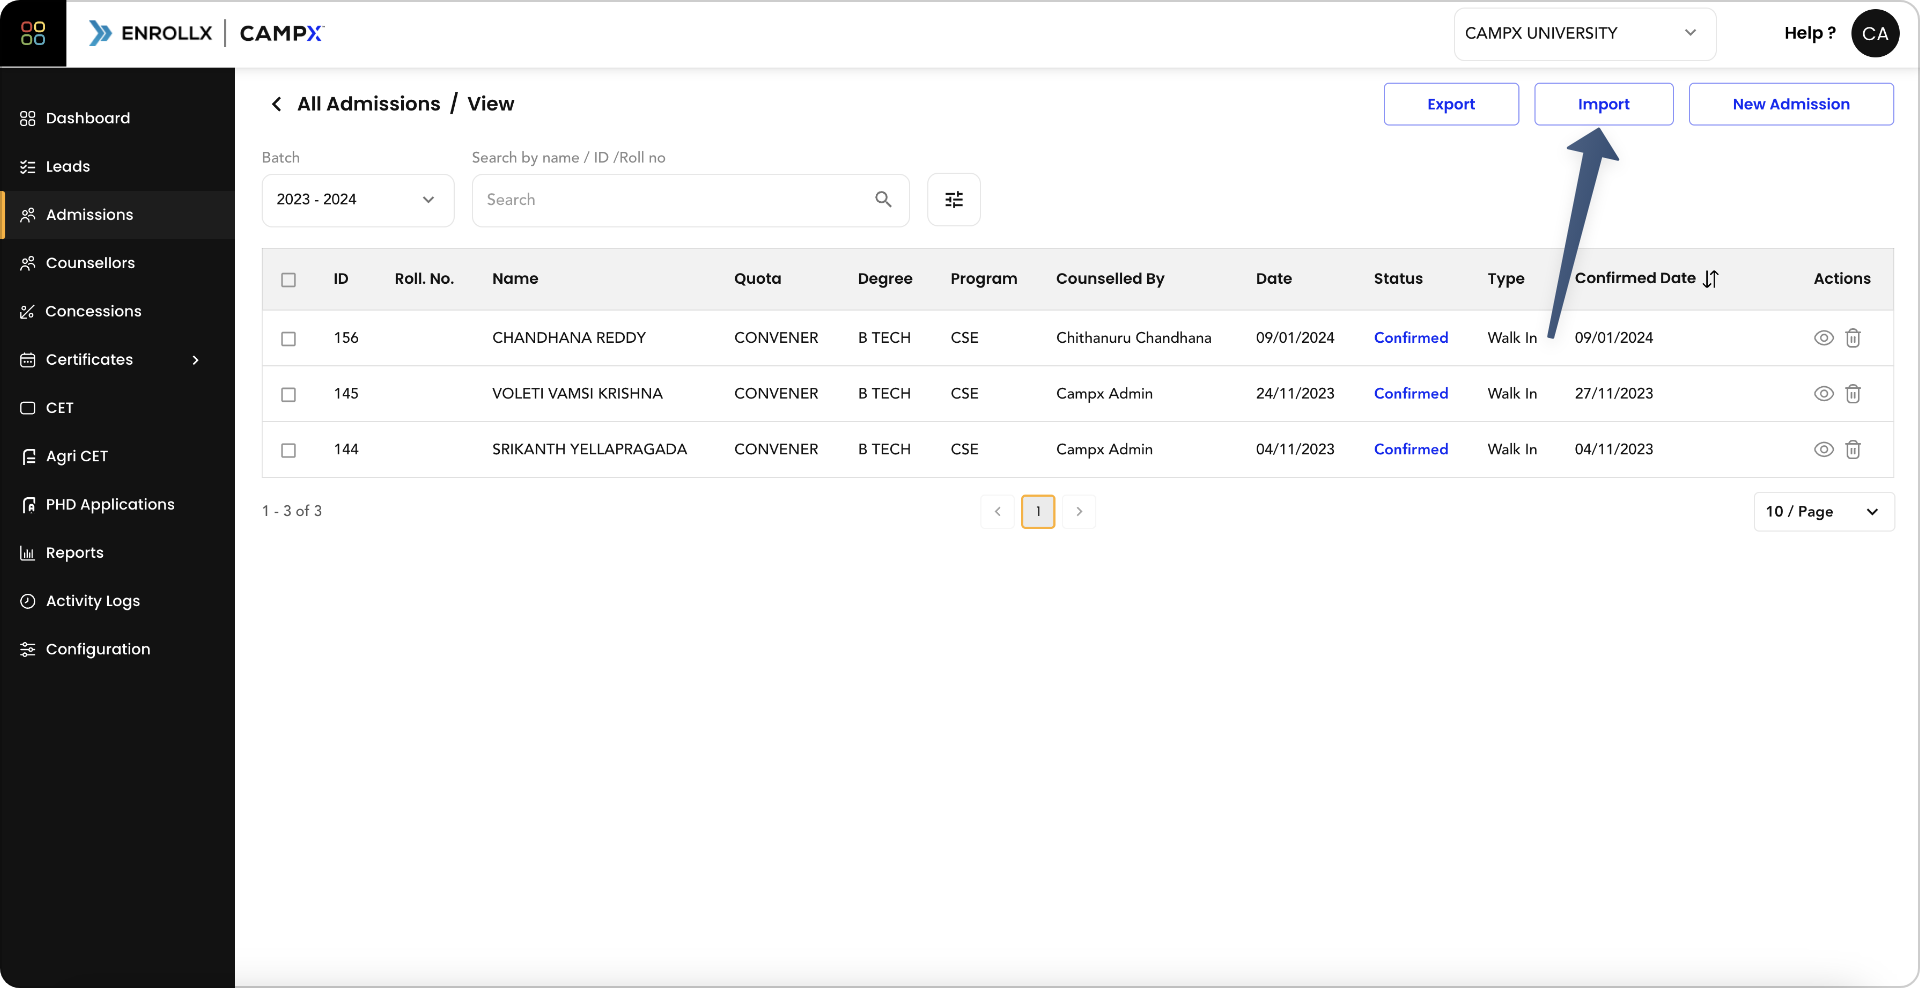
Importing Admissions: Use the Import Admissions function to bulk upload admissions data from Excel sheets. This feature saves time and reduces manual data entry errors.
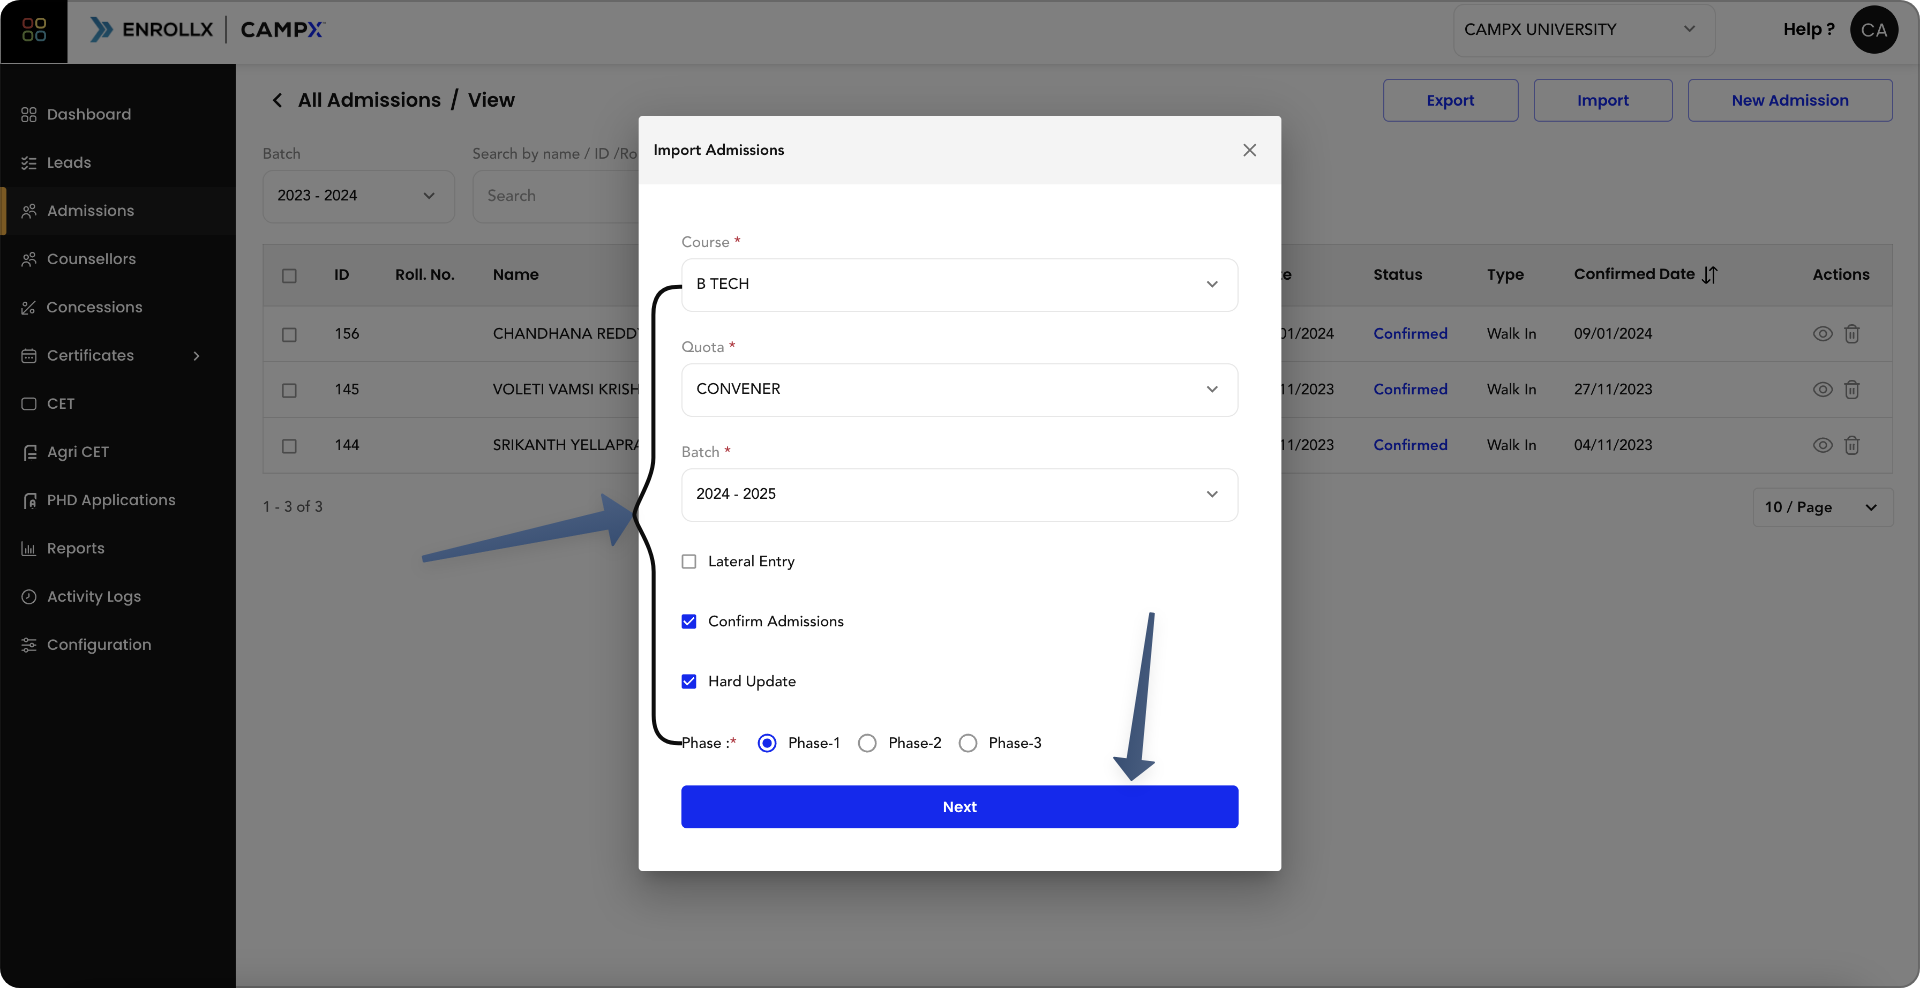
- The Admissions Team needs to select the
Course,Quota, andBatchbefore importing the admissions data. - The Admissions Team needs to update the checkbox if they are
Lateral Entry Students,Confirm Admissionbefore importing the admissions data. - The Admissions Team needs to select the respective
Admission Phasebefore importing the admissions data.
- The Admissions Team can download the
sample excel sheetfor importing the specific admissions data.
- The Assigned Counsellor can import the excel sheet, by following all the guidelines mentioned in the sample sheet.
- If you are facing an error while importing please check all the respective rows and columns in the excel sheet.
Deletion of Admissions:
- Select the
Admissionsyou intend to delete. - Click the
Delete Selectedaction button or click on the trash icon next to the respectiveAdmissionin the table. - Confirm the deletion to remove the selected
Admissionsfrom the list.
Export Admissions:
The Admissions Team can click on Export Admissions button to download the list of student admissions in an excel sheet for that respective batch.
Utility of the Feature for Creation of Admissions
- Enables quick and easy input of new student information into the system.
- Simplifies management of admissions through search and filter capabilities.
- Offers functionality for batch processing, saving time for administrative tasks.
- Facilitates better organization and tracking of the admissions process.
Support and Assistance
For any additional support or questions regarding the New Student Admissions feature, please consult our CampX Support Docs for detailed guides and FAQs. The EnrollX support team is also available to provide personalized assistance, ensuring you can fully utilize the capabilities of the CampX platform for your admissions needs. For guidance or queries, access our support docs via CampX Support Docs.